Manual Launcher
Launching JWildfire
What you'll see when JWildFire starts
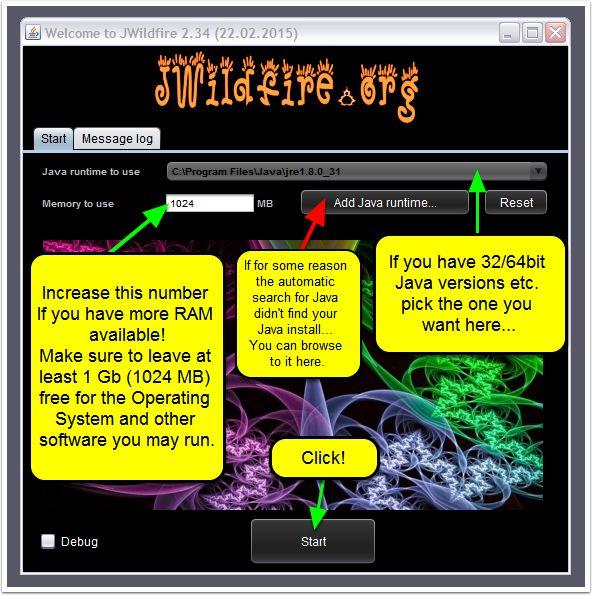
The first thing you'll notice when you start JWildFire is the initial "Welcome to JWildfire" (version No. and compiled date) window opening up...
This contains the Java Environment startup options, with a couple of optional settings.. JWildfire is just as happy working in 32bit mode as 64bit (optimal if your OS supports it).
When you are happy with your settings click on "Start"!
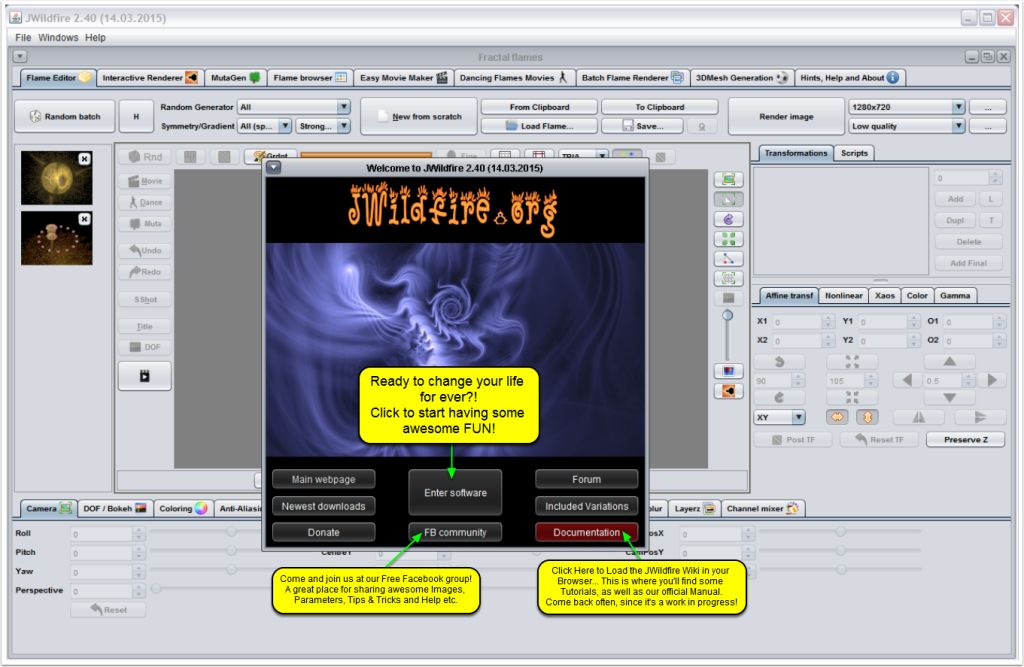
Shortly after this window disappears, you'll see the main "Welcome to JWildfire" window open with the main JWildFire interface behind it...
Meet JWildFire!
Thanks for your patience... I know it may have seemed like a lot of steps to get here but you shouldn't have spent more than 5 minutes or so.
Now it's time to show you why it was worth it!
Alternative Ways of Starting JWildFire...
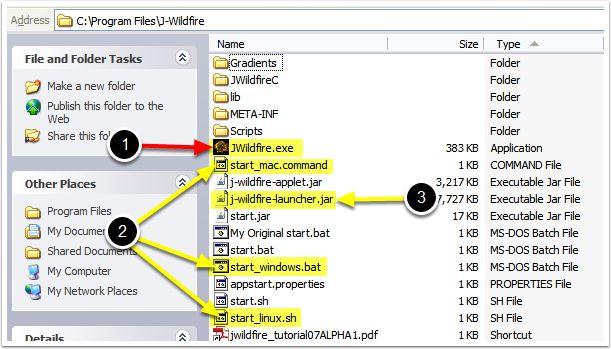
In the unlikely event that using the "JWildfire.exe" file isn't starting up the software properly, there are alternatives...
These alternatives are found in your JWildfire installation folder. The first option is using one of the supplied platform specific start-scripts available in your installation folder:
"start_windows.bat", "start_mac.command" or "start_linux.sh"
Alternatively you can use the "j-wildfire-launcher.jar" file instead.
If you use any of these alternative startup methods you could just create the shortcut, as described Here!, for the alternative file instead of the "JWildfire.exe" file...
Support and Community Options
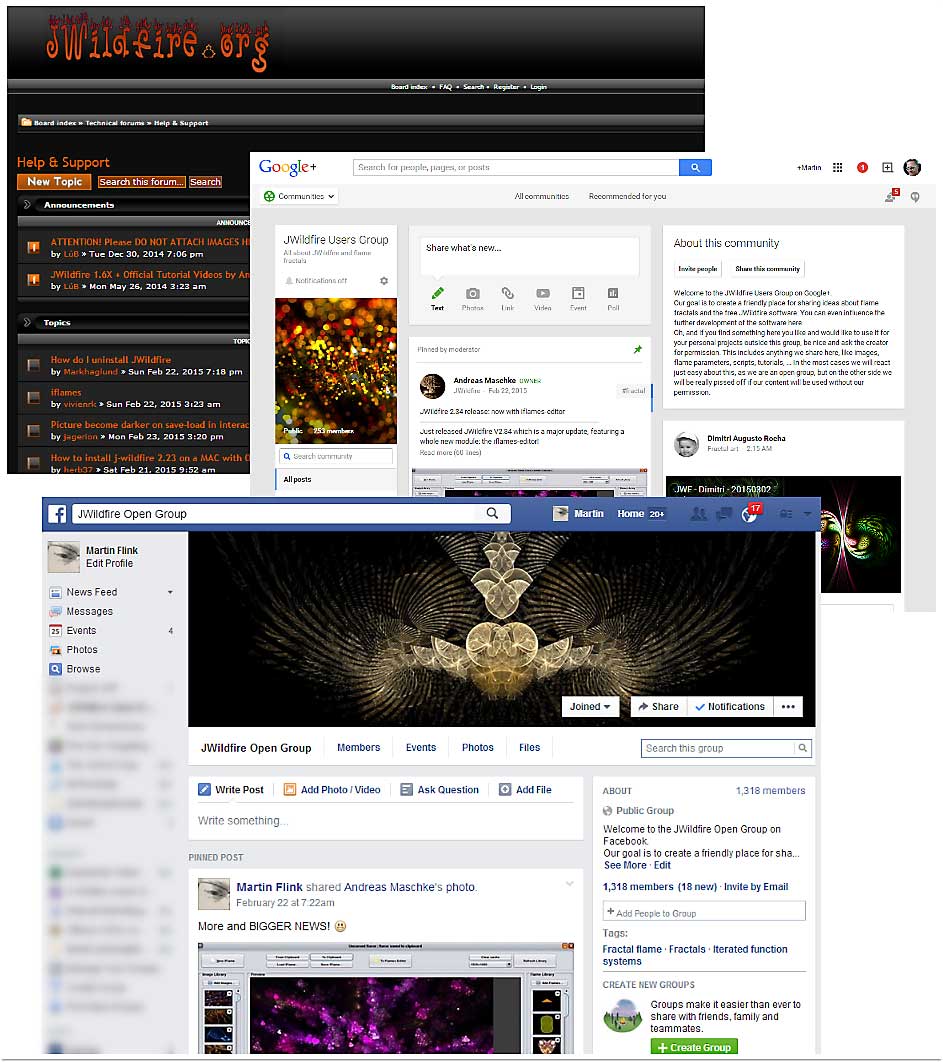
If you do have any trouble getting started, one of the best ways to get help is by joining our Official Facebook Group! You will find us by clicking on the "'FB community" button on the welcome screen as seen above or you can click here!: JWildfire Open Group
Please Note! Technical Support Issues should first be checked (since most solutions already exist) over at the "Help & Support" Section in our Forum! Click here for the Tech Support Area
If you can't find a solution for your problem in the Forum or by asking (nicely) in the Facebook Group... Please Create a New Topic with a detailed explanation of your problem and your specific equipment, in the Forum. This makes it easier to keep track on any outstanding issues and it allows for easier searching for previously solved problems and their solutions.
Our growing Google+ Community can be found here: Google+ JWildfire User's Group
Onwards and Upwards!
That concludes this step-by-step JWildFire (and Java) installation Guide.
We hope you enjoyed getting ready... To PLAY and Have FUN!
See you in the next Module and on Facebook, G+ or the Forum!
More technical information about the launcher
Try not to start the j-wildfire.jar directly
Please always use the official launcher to start JWildfire. The launcher can be executed by any Java runtime and can be started with any options. The task of the launcher is to launch the main software with controlled options and to reserve enough memory.
- Your First Option is to use JWildfire.exe to start the launcher. Mainly because the executable file also contains a suitable Icon, which is used when you create a shortcut.
- Alternatively:
- under Windows use the start_windows.bat to start the launcher.
- under Mac OS use the start_mac.command to start the launcher.
- under Linux use the start_linux.sh to start the launcher.
If this doesn't work or if you have another operating system not listed here, just start/open the j-wildfire-launcher.jar directly.
PLEASE DO NOT START THE j-wildfire.jar DIRECTLY!
If you start the j-wildfire.jar directly, then JWildfire is started with default Java options.
In most cases you cannot render large images with those settings because enough memory is not reserved at startup. So even if you have plenty of memory it can not be used for rendering this way. Additionally, the wrong settings may cause slower rendering.
How the Launcher works
The Launcher analyzes certain system settings to locate java runtimes on your system and automatically selects the most recent one.
You can override the automatically selected version by selecting another entry in the listbox.
If the scanner did not find a java runtime (probably on Macs as we have no way to test this) you can manually add it. You only have to do this once, of course.
The memory setting lets you specify the maximum amount of memory in megabytes to use. This memory amount is only allocated if required but there is no way to allocate more memory than specified here, if JWildfire is already running.
So you must choose this value wisely.
Example: 6000 MB should work fine to render images in high-end quality for print.
Troubleshooting
The launcher works in two ways: regular and debug mode. In regular mode it just starts JWildfire and shuts down itself. If you face any problems (i.e. JWildfire does not start) please activate the "Debug" checkbox. This forces a traced launch where log messages are recorded and displayed at the "Log messages" tab. You can easily copy those messages into the clipboard by using the "To clipboard" button and then report them for further assistance.


