Manual Flame Fractals
Contents
Rendering
The final process to generate an image from a flame is called rendering. There are various parameters which affect the quality of your final image and there are even different ways in which you can accomplish the task. (Interactive Rendering, Render button or Batch Rendering)
During the render stage the computer is building your fractal image by a process called sampling. The longer you allow your fractal to render the better results you obtain, i.e. more samples are generated. There is always a tradeoff between render time and quality.
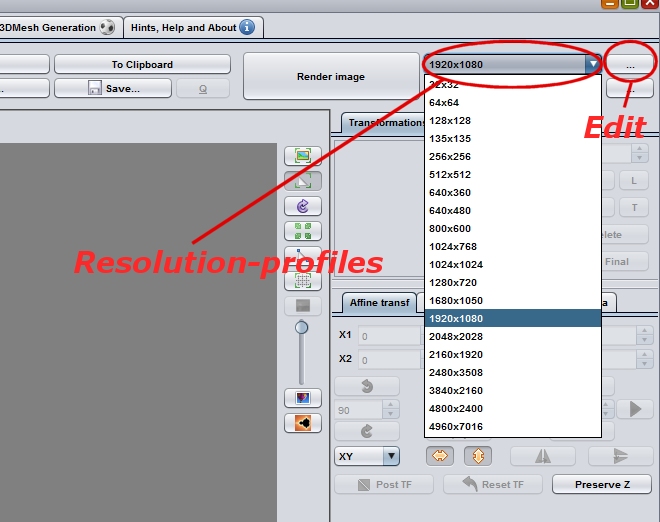
Resolution-profiles
To specify the size of rendered images in JWildfire you use resolution-profiles. i.e., a resolution-profile (currently) defines width and height of an images.
There are some predefined resolution-profiles, but you can edit them and define your own. This set of resolution-profiles is accessible in all modules that work with image-sizes e.g. editor, IR, and batch renderer.
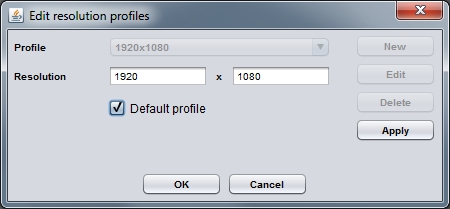
Defining your own resolution-profiles
In JWildfire there is virtually no limit on render-size and you can define any number of resolution-profiles at any size. But, of course, the larger the render-resolution, the more memory is needed.
To define or edit a resolution-profile, enter the main flame-editor and head over to the list-boxes in the right upper area.

You will see the following options:
- Resolution: width and height in pixels
- Default profile: Can only be selected by one profile and defines the profile which is automatically selected at startup
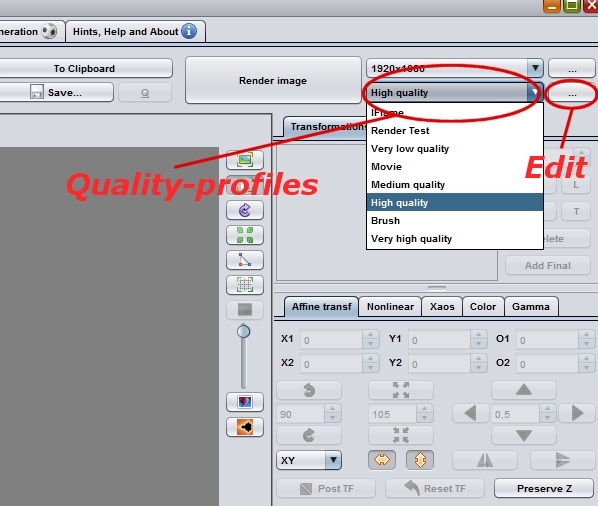
Quality profiles
To specify the quality of rendered images in JWildfire you use quality-profiles. Additionally, you can specify if an addional HDR-file should be generated when using this profile.
There are some predefined quality-profiles, but you can edit them and define your own. This set of quality-profiles is accessable in all modules which work with rendering.
Defining your own quality-profiles
You can define any number of quality-profiles. They are sorted by an internally calculated quality index. The quality-profiles with less quality (i .e. faster rendering) are on top of the list, where the profiles with the best quality are at the bottom of the list.
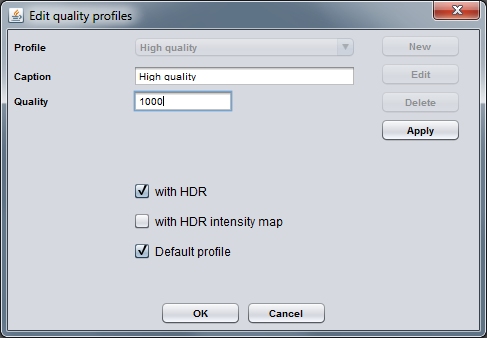
To define or edit a quality-profile, enter the main flame-editor and head over to the list-boxes in the right upper area.

There are the following options:
- Caption: the text which is displayed in the listbox, please note that the listbox is sorted by an internal quality-indicator, and not by this caption.
- Quality: the desired quality-setting for the renderer. A mediocre value is 100 (which means something like "100%"), for wallpapers you should play with values in the range of 500...1000, for generating high-quality-prints with values in the range 2000...5000.
- with HDR: automatically save the raw image in Radiance-HDR-format for tonemapping outside of JWildfire. Please note, that the generation of this image does not need aditional time, but some memory. So, if in doubt, when generating high-quality-content, you should generate it.
- with HDR intensity map: automatically save the raw intensity-map in Radiance-HDR-format. Not recommended, only for experimental purposes.
- Default profile: Can only be selected by one profile and defines the profile which is automatically selected at startup.
The different renderers
Because there are so many different requirements for rendering, it is hard to implement them all into one renderer. So, JWildfire currently features 3 different renderers.
They fall into two categories:
- Renderer with fixed quality: renders until specified quality level is reached, this has no interactive display.
- Interactive render: renders indefinitely and continuously displays the result while rendering, let the user decide when to stop.
Because the display takes some time to process (e.g. a tonemapping-step is involved for each update of the display), an interactive renderer is usually slower than a renderer with fixed quality. But, it is unequalled fun to see how the image is created and it can be very useful to be able to control when to stop, or not to stop, depending on the invidual fractal. When using a renderer with fixed quality it is sometimes a trial-and-error process when you don't know which quality level you will need to get a smooth image. A nice feature to help deciding on quality before a render, is the standard alone Miniature Interactive Render Preview window which is scaleable and provides a very fast preview with quality factor display.
The main renderer in the Flame-editor
A renderer with fixed quality (specified by the quality-profile you selected). Fastest option for rendering a single image when you know which quality you need.
The Interactive Renderer
The Interactive Renderer is a whole sub-module and resides in a dedicated tab with the same name. It is the best option for rendering single images when you are not sure about the quality you need. Additionally, you can pause and resume a render in this module. So it is also the best option for really large renders.
The Batch renderer
The Batch Renderer is a whole sub-module and resides in a dedicated tab with the same name. It is the best option for rendering multiple images at fixed quality, especially frames for movies. N.b. the option to apply different Resolution and Quality settings on selected individual flames in a batch, is available by double clicking and typing in the values in the related cell(s) in the batch list.
What affects render time?
- Flame-layout is very important for render-time:
- Number of variations in a certain transform
- Type of variations used. There are slow ones (e.g. "crackle") and fast ones (e.g. "spherical")
- Number of final transforms
- Number of variations in final transforms
- Bokeh effects work similar to a final transform and can take a lot of time
Please note, that the number of regular transforms does not affect the render time.
- Output
- Resolution
- Desired quality
Scripts
Scripts are a very powerful and flexible way for users to extend the software. They are written in the Java programming language and are not compatible with scripts known from the Apophysis software (which are written in the Delphi-dialect of pascal)
Even if most available scripts are used to create (random) flames, they are not restricted to create flames. You could also create a calculator or anything else you can imagine.
How do scripts work
JWildfire uses it's integrated Java-compiler to compile the scripts on-the-fly into executable code. This means that you could also perform serious calculations in your scripts, because they are fast. And you may use the common Java-libraries and all libraries which are part of JWildfire.
How to use existing scripts from other users
Create a script-folder
In order to work with scripts, you have to first to create a folder were your scripts are stored. As with all of your own data, this folder should be OUTSIDE of the JWildfire folder. So, if you remove/update the JWildfire software, your data is always kept safe. If you have no idea how to name it, you can just create a folder "D:\JWildfire-Data\scripts"
Tell the software about your script-folder
After creating the folder you must enter it's complete path into the Preferences. So, open the Preferences-window from within the main window-menu and locate the property tinaJWFScriptPath. Copy the script path, in this example "D:\JWildfire-Data\scripts". Double-click at the row with the parameter in the 2nd column, so that you can enter text. Paste the script-path and press <ENTER> and press the Save and Close-button
Import the scripts
To import a script just extract the *.zip-file to your script-folder so that the *.jwscript and *.txt-files are placed directly into the script-folder (without sub-folder). Example: If you have downloaded a script "butterfly.zip", it should contain two files "butterfly.jwfscript" and "butterfly.txt". Copy these two files directly into the script-folder.
Press the Rescan-button on the Script-tab to refresh the script-view inside of the software.
In the example you should then see a new item called "butterfly".
How to start a script
Start from within the script-view
Just select the script in your script-view and press the Run-button to execute a script.
Create a custom button for the script
You can also create buttons for easy execution of your favourite scripts.
To add a button just select the desired script in the Script-view and press the Add macro button-button. You will see a new button you may click to execute your script at any time.
You can customize or remove this button on the Macro buttons-tab at the Scripts-tab.

