FlameFractalTutorial06
How Can I create my own gradients?
Creating your own gradient to use in your work is the best way to assure you have the perfect color where you want it in your fractal and Jwildfire has given us a great tool for this job. Open a fractal in the editor to start.
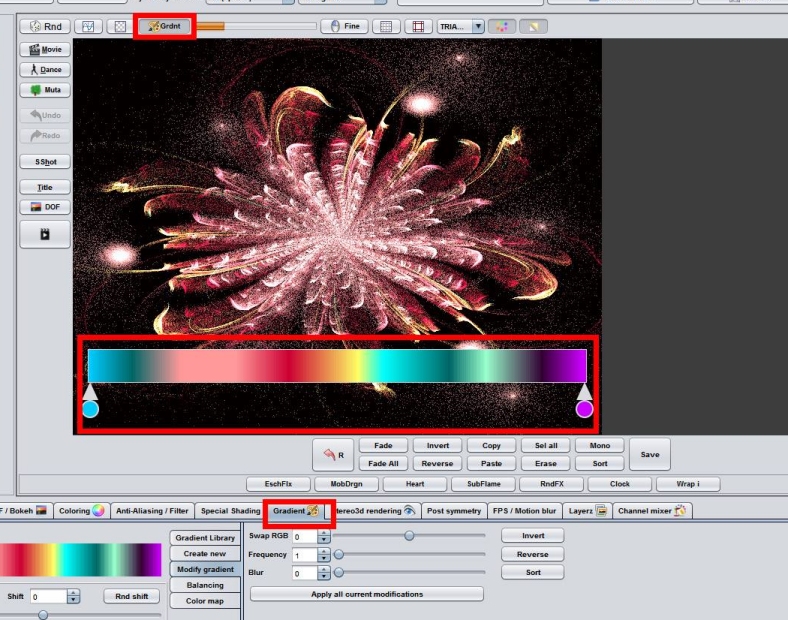
In the editor window just above the left corner of the editor screen (where your fractal opens) you will see the “Grdnt” button. When you click the "Grdnt" button, the display window will shrink slightly and the currently loaded gradient will be displayed as a bar across the bottom of the editor window. At the same time, 12 new buttons will be added below the display window.
The gradient bar has 2 arrow indicators below it with a circle of color indicating the color it is pointed at. The arrow indicators can be moved by clicking on the arrow portion and dragging it to the new position. Clicking on the circle below brings up a color selector to modify the color for that spot.

To start off making a whole new gradient, click on the “Erase” key at the bottom to clear the gradient and give you a solid black bar (which will also make your fractal all black). Position one of the arrow indicators where you want your first color to start, click the circle to bring up the color picker and chose a color for that spot. The tabs across the color picker give you several options for adjusting the color or you can simply use the swatches. You will get a thin line of color in the spot over the arrow.
Once you have your first thin color bar, move the second arrow to the position where you want the next color to start, chose a color and once that is done, click on the “Fade” button under the window. You should now have a wide bar of color that fades from the first to the second color. Select another location on the gradient, another color and continue until you have the gradient you want.
There are many other options.
- You may fade all the lines at once using the “Fade All” or you may set the arrows to define a section of the current gradient and click "Copy" then move the arrows to a new position and "Paste" the same color pattern in that area.
- The large button with "R", and an arrow, brings you back to your original gradient.
- The "Sort" button will sort whatever is between the two arrows, and may give nuance to 3D settings.
- The "Mono" button (most of the time) will put the included area into one color family. with variation from light to dark.
- When you don't want to change the "Xaos" settings of your fractal, the "Erase" will turn the unwanted color black. Place the arrows around the color or colors you wish to change, then click Erase.
- Remember, if you make changes that you are unhappy with, the undo button on the left side of the editor window will take you back one step at a time. Just click undo until you are back to a point before the change you do not like and start over.
- Even if you're not quite satisfied with your fractal's appearance, it never hurts to Save. You can open the gradient folder while looking at your gradients to delete duplicates or move gradients into the right folders. Then press "Rescan"
Play around with the different options to refine your gradient, then go to the "Gradient" Tab at the bottom row (with the Camera, DOF, Color, and so on) and modify your colors in other ways.
When you are happy with your work, be sure to save your gradient. Click on the large "Save" button to the right end of the row of 12 buttons. This should open up your file browser. Select or create a folder for your custom gradients, name your file and save. When you restart JWildfire your new gradient will be available in the gradient library. If you want to use it for another fractal without restarting, go to the "Gradient" tab, and open the Gradient Library section. Click the "Rescan" button to load any new changes.